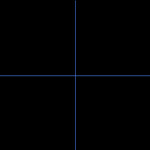
Create a new image (width and height must be multiples of two in fact you'll see why. Also you should change the image mode to RGB). Fill the background in black. Now take the ruler markers at the top and left and place them in the center of the image. You should get a cross in the picture. Create a new layer.
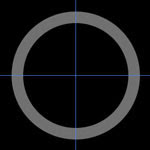
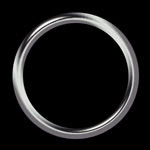
Select "Elliptical Marquee tool", and then move your mouse above the place where the lines cross. Press and hold ALT + SHIFT keys, and then create a circle. Fill it with gray color. Repeat this, but make a second circle a slightly smaller diameter. Now, press DEL to cut the smaller diameter. Cancel the selection by pressing CTRL-D. You result should be a gray ring.
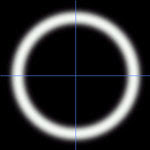
Press CTRL key and click on the layer where the ring is located. This step will mark up filled region of the ring. Go to [Select> Save selection]. Leave it settings default and click "ok". With the selected ring, go to the "Channels" and create a new channel. Leave the channel name default too. Fill the selected area in white, and deselect the choice(CTRL-D). Now you'll need to apply a blur filter [Filter> Blur> Guassian blur]. At the first pass use the filter 4, then 3 and then then 2.
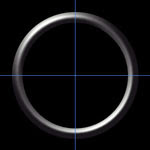
Now go back to layer with a ring. Go to [Select> Load selection] to load the previously selected area. Go to [Filter> Render> Lighting effects]. In the "Texture channel", select your blur channel (it usually has a name "Alfa 2"). Other settigs are:
Intensity: 35
Focus: 69
Gloss: 69
Material: 69
Exposure: 0
Ambience: 8
Height: 80
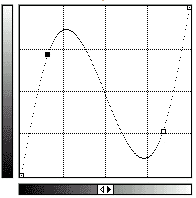
In order to smooth the edges of your ring, press the CTRL-key and click on this layer in Layers list. Go to [Select> modify> Contract]. Select 1, and then click OK. Now invert the selection and press the DEL-key. You can also remove the "cross" because you don't need it anymore. Go to [Image> Adjust> Curves]. In order to get a realistic "silver effect" set the curves as shown on the picture below:
Now we need to add some color to our ring. Go to [Image> Adjust> Hue / Saturation]. For example a light yellow tint will create the effect of golden ring. This how-to can be used to create not only rings.
 In order to give your selection some depth, use a dark airbrush and gently shadow the one side of selected area. Use a light airbrush and enlight the other side.
 Now choose any texture that you want from your own collection, and apply it on top. Set the transparency to 50-60%.
 I'm usually create a new layer and then draw a set of thin lines and blur them, so they add a vintage-look to image. Then I start to shadow their edges with the help of dark airbrush tool.
 That's how it looks like after using dark airbrush tool.
 Now, simply combine layers and duplicate the resulting layer. You'll probably need to do a little bit more work on the image, but it should look something like this.


