Going through that photoshop tutorials you will be able to draw like a pro!
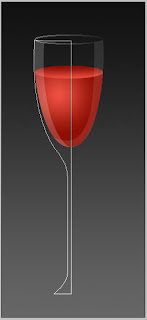
1. Create a new document in adobe photoshop (size 250 * 550). Start drawing the contour of wine with the help of Pen Tool and Convert Point Tool:
 2. Rasterize the layer. Here is the basic adobe photoshop elements. Select the content of the layer holding down "Ctrl" and clicking on the layer on the layers panel. Set up the colors : EE5141> 8E0F04. Select "Gradient Tool", choose type "radial" and fill the selection with gradient filling as shown below:
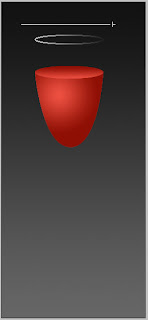
3. Now let's portray the upper surface of wine. I'm using adobe photoshop cs3. Make a selection using photoshop brushes "Elliptical Marquee Tool". Create a new layer. Fill up with gradient using the same colors, but with type "linear":
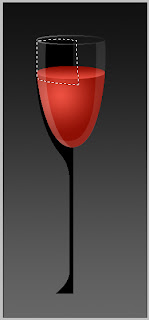
 4. Now we can start drawing the glass. Here we will use some photoshop effects. To have a better visibility let's create the background, for example, gray gradient (use color 111111> 666666):
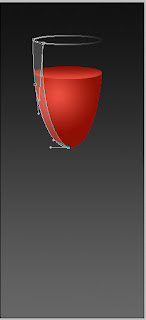
 5. Select the layer with the upper surface of wine and load the selection. With tool "allocation" selected, press Shift + "Arrow-up" on keyboard six times. Thus, we raising up the selection. To observe the laws of perspective, choose Select> Transform Selection and reduce its height. Then choose Select> Modify> Border> 2px.
Create a new layer and fill up the selection with white color:
 6. Let's add a mask to the layer and place the gradient from right to left, as shown on the picture:
 7. Create a new layer with transparency=20% and with the help of "Pen Tool" draw the flare:
 8. Create a new layer and using "Pen Tool" draw another flare on the right side with transparency=10%. Now change the transparency of the layer with the rim, for example, to 50%:
 9. Select "Pen Tool" and draw a figure as shown on the picture (on the new layer!):
 10. Then rasterize the layer and create a selection. Fill up with black color and put behind all the layers. Create a selection to remove the part of the black figure that we don't need:
 11. Remove unnecessary part. Duplicate the layer (Layer> Duplicate Layer) and flip duplicate horizontally(Image> Rotate Canvas> Flip Canvas Horizontal) combining with the original layer to get the right figure:
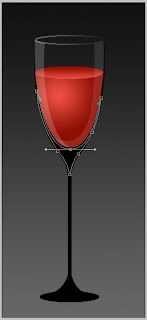
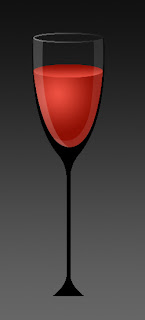 12. With the help of "Elliptical Marquee Tool" draw the base of the stalk and fill up with black. Let's combine all the elements of the black figure in the one layer.
 13. Using "Pen Tool" outline the area on the base of the stalk, leaving the dark area on the edges:
 14. Now choose "Make Selection", "Select> Feather> 2px". Select the layer with the stalk and press Delete. Next, using a "Rectangular Marquee Tool" and Select> Feather> 1 or 2 px (depending on the thickness of the stalk) remove an area within the stalk. Then, using the "Pen Tool" draw the figure at the bottom of the stalk:
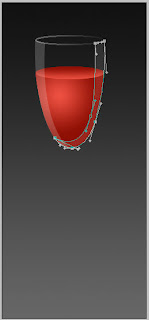
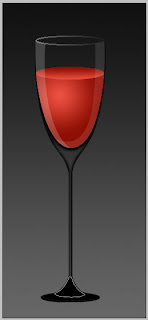 15. Create a selection. Cut and paste it on the new layer at the same place where we have been cut. Use the mask on that layer . Draw a gradient from the top to the bottom:
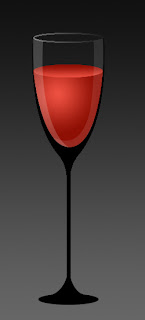
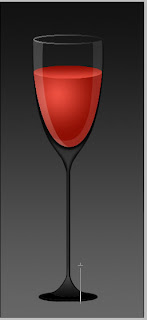 16. Using "Elliptical Marquee Tool" select the area on the base of the stalk. Cut and paste it on the new layer at the same place and change the layer transparency to 65%:
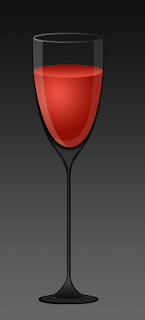 17. Then you can add some flares with the help of the brush. The glass can be placed on the any background.


 4. Now we can start drawing the glass. Here we will use some photoshop effects. To have a better visibility let's create the background, for example, gray gradient (use color 111111> 666666):
 5. Select the layer with the upper surface of wine and load the selection. With tool "allocation" selected, press Shift + "Arrow-up" on keyboard six times. Thus, we raising up the selection. To observe the laws of perspective, choose Select> Transform Selection and reduce its height. Then choose Select> Modify> Border> 2px.
Create a new layer and fill up the selection with white color:
 6. Let's add a mask to the layer and place the gradient from right to left, as shown on the picture:
 7. Create a new layer with transparency=20% and with the help of "Pen Tool" draw the flare:
 8. Create a new layer and using "Pen Tool" draw another flare on the right side with transparency=10%. Now change the transparency of the layer with the rim, for example, to 50%:
 9. Select "Pen Tool" and draw a figure as shown on the picture (on the new layer!):
 10. Then rasterize the layer and create a selection. Fill up with black color and put behind all the layers. Create a selection to remove the part of the black figure that we don't need:
 11. Remove unnecessary part. Duplicate the layer (Layer> Duplicate Layer) and flip duplicate horizontally(Image> Rotate Canvas> Flip Canvas Horizontal) combining with the original layer to get the right figure:
 12. With the help of "Elliptical Marquee Tool" draw the base of the stalk and fill up with black. Let's combine all the elements of the black figure in the one layer.
 13. Using "Pen Tool" outline the area on the base of the stalk, leaving the dark area on the edges:
 14. Now choose "Make Selection", "Select> Feather> 2px". Select the layer with the stalk and press Delete. Next, using a "Rectangular Marquee Tool" and Select> Feather> 1 or 2 px (depending on the thickness of the stalk) remove an area within the stalk. Then, using the "Pen Tool" draw the figure at the bottom of the stalk:
 15. Create a selection. Cut and paste it on the new layer at the same place where we have been cut. Use the mask on that layer . Draw a gradient from the top to the bottom:
 16. Using "Elliptical Marquee Tool" select the area on the base of the stalk. Cut and paste it on the new layer at the same place and change the layer transparency to 65%:
 17. Then you can add some flares with the help of the brush. The glass can be placed on the any background.
No comments:
Post a Comment