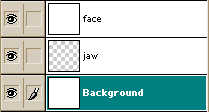
Open the black and white photograph of a person and duplicate the layer. Call it "face". Make the layer with white backgrounds. Create a new layer and name it "jaw". It should look as follows:

Bring the image into a RGB format [Image> Mode> RGB Color]. Photography was still black and white, but we have an opportunity to change that. Go to [Image> Adjust> Color Balance] and set the value as indicated below:
Highlights: color levels +20 0 -15
Midtones: color levels +25 0 -25
Shadows: color levels 0 +15 -20
Shadows
Now, when she became a greenish color, we impose the shadows with burn tool: to set the exposure at 15% and burn the shadows around the eyes like this, as indicated below (right eye).

Select the airbrush and use the "color mode" on the gray shadows beyond the eyes. When you are finished it should look like (right eye):

Do the same on the chin and near the mouth to make it more gaunt appearance.

Larger image of the processed mouth...

Eyes
Well ... Now do the zombie look. First, fill the shell of the eye with white color, then make a little dot in the middle. Now, using the dodge tool make the eyes flame out. You can experiment with airbrush in "color mode". I used the red color in the left and right corner of the eye.

Clotted blood and flesh!
Well - we finished only the simplest part of the work. Now it is the time for the flesh. First make a large hole in the rotten jaws. Make a hole in the layer of "face". Dark-red small brush would be the best to create the effect of rotting meat. Use eraser to create a transparent hole. It is time to search a picture of a skull and cut him from the jaws of the image. If the newly cut layer is in color - translate it into black and white. That's about it should look like:


Go to [Image> Adjust> Color Balance] and to set the values as indicated below:
Highlights: color levels +10 0 -10
Midtones: color levels +10 0 -15
Shadows: color levels 0 0 -10
Now all this looks a little bit flat - we will try to fix it.

To create shadows, use the burn tool around the edges of the cutout.

It is time to do really terrible things. To do this you will need an airbrush with the size of 1 pixel. Use a dark red color and dark yellow/brown, but first you need to switch to a layer "face". Experimenting with fibers and pieces of flesh give the hole as septic appearance as possible. Try to zoom the picture to work best with the details, then try copying technique. Now use the burn tool and make some shadows on the right / bottom side of the hole in his cheek - so you can give it greater depth and expressiveness.
Finally, take the airbrush in the "color mode" and gives the gums dark red hue:


Scars
Let's make a small scar above her eye. First, make a small shadow:

Then make a scar deeper, adding a blood-red

Now make a shadow on the sides so that the scar seemed to be contracted.

Rotting Skin
This is the final step - to make your skin look putrid. First, add a little color, using a large diameter airbrush in "color mode". I used a greenish-red and violet.

Take the burn tool and create a set of uneven lines on his face as given below:

That's all! It would not hurt to work on small details to complete the masterpiece, but I think you can do it yourself ;)

Also, you can check out my friend website about Beltronics Radar Detectors. There are a lot of useful info here.


